Introduction
UPVC pipes (unplasticized polyvinyl chloride) are among the best and the simplest to install home plumbing solutions. They are also common in the supply of water, drainage systems and even irrigation due to their durability, low cost and low maintenance. This is the good news though, you do not necessarily need a professional plumber to install them. You may also learn how to install uPVC pipes yourself with the proper tools and instructions and save time and money.
In this blog, we will take you through the process of installation step by step, together with the most important information such as tools, fittings, necessary information on best practices to make sure the pipeline is leak proof.
Tools & Materials Needed
Before starting, gather these essentials:
-
uPVC pipe (white, grey or black uPVC pipe) used depending on usage.
-
uPVC pipe fitting (elbows, tees, couplers)
-
Pipe cutter or hacksaw
-
Deburring instrument or fine sandpaper.
-
Solvent cement (uPVC pipes and fittings)
-
Marker and measuring tape
-
Clean cloth for wiping ends
Having the right materials, like 1 inch uPVC pipe or 4 inch uPVC pipe, ensures a smooth workflow.
Step-by-Step Guide to Installing UPVC Pipes
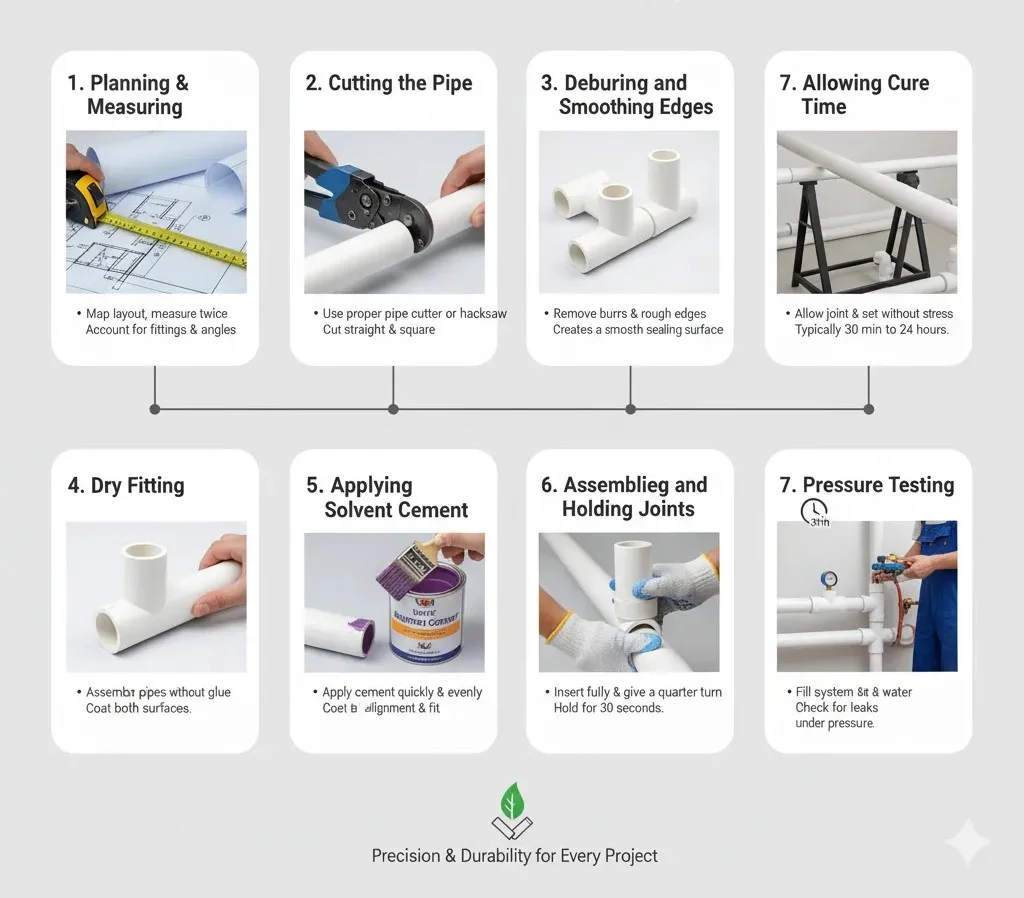
1. Planning & Measuring
Begin by drawing a sketch diagram of your uPVC pipeline to see the route. Indicate the location of fittings e.g. bends, joints and connectors. Be careful with the distance and note down sizes of the pipes required. The most common ones are 1 inch uPVC pipe to use in small water supply lines, 40mm uPVC pipe to use in medium flow application and 6 inch uPVC pipe to use in larger drainage systems. The appropriate size will be selected; it will reduce wastage and make it efficient. You may choose to use grey uPVC pipe, black uPVC pipe, or white uPVC pipe depending on your choice, and the use.
2. Cutting the Pipe
Note the measured length using a marker. Straight cut use a pipe cutter or hacksaw. Make sure that your cut is made perpendicular to fit between pipes and fittings.
3. Deburring and Smoothing Edges
Sandpaper or deburring tools can be used to wipe out burrs on ends of cut pipes. Wipe the inside and outside of the pipe and fitting using a dry cloth. This will avoid leakages and tight joints.
4. Dry Fitting
Prior to the laying of any cement, fit the pipe into fittings on a dry basis to ensure that they are in alignment. Fittings must not be too loose or too tight.
5. Applying Solvent Cement
It is very important to apply the solvent cement in a thin and smooth coating to the outward end of the pipe and the inner part of the fitting. Put the pipe as fast as possible in the fitting and twist slightly to spread the cement. Wait a minimum of 30 seconds.
- Avoid excess cement; it can make joints weak or cause blockages inside pipes.
6. Assembling and Holding Joints
Insert the fitting all the way to the bottom of the socket by pushing the pipe. Turn a quarter to spread the cement evenly. Put the joint in position so that it does not move until the adhesive begins to dry.
7. Allowing Cure Time
Allow at least 30 minutes to cure the joints and preferably 24 hours before subjecting to the pressure of water. Premature motion may result in leakages or loose unions.
8. Pressure Testing
After treatment, ensure that all the joints are dry by putting a bit of pressure on water. In case of any leaks, dry the place and apply solvent cement where necessary.
Common Mistakes to Avoid
-
Omitting deburring/smoothing stages: may result in leakages.
-
Excessive or insufficient amount of solvent cement: weaken joints.
-
Failure to keep joints until it is set: danger of misalignment and leakages.
-
Pressure prior to the drying of cement: creates failures.
-
Poor spacing of pipe clips: pipes can be found to hang slack in horizontal runs.
Maintenance Tips for DIY Installations
-
Regularly check pipes to identify leakage or damages, mostly at the joints.
-
Wipe down with low strength detergent and water.
-
Wrap up uPVC pipework during cold environments.
-
Leaks should be repaired as early as possible to ensure efficiency of the systems.
Application Areas
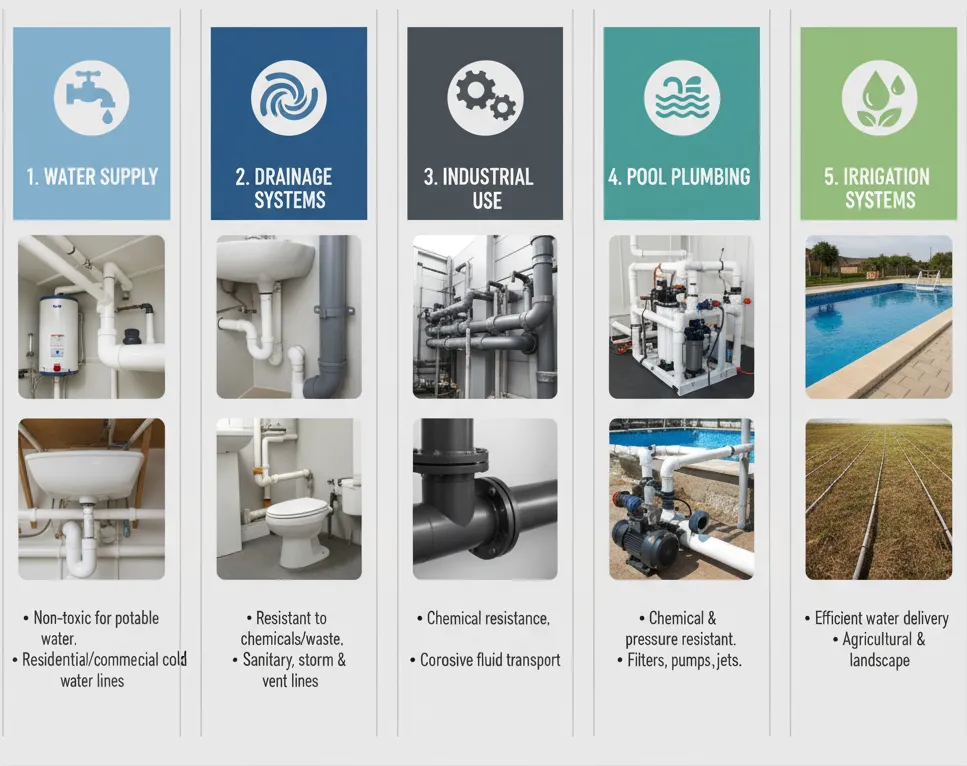
uPVC pipes and fittings are suitable for:
-
uPVC fittings and pipes can be used on:
-
Lines (white uPVC pipe) of water supply.
-
Drainage uPVC pipes
-
Grey/black uPVC industrial pipe.
-
Pool plumbing
-
Irrigation systems
Conclusion
Installing uPVC pipes without a plumber is absolutely possible with the right tools, step-by-step guidance, and a little patience. From careful measuring and cutting to proper jointing and sealing, each step ensures a durable and leak-free pipeline system. While DIY installations can save time and cost, choosing the right quality of pipes makes the biggest difference in long-term performance.
At Scotto Pipes, we manufacture and supply a wide range of reliable piping solutions including PVC pipes, uPVC pipes, suction pipes, and garden pipes designed to meet residential, agricultural, and industrial needs. Our products combine strength, durability, and ease of installation, making them the preferred choice for both professionals and DIY enthusiasts.
FAQ Section
Q: Do I need special tools to install a uPVC pipe?
A: No, basic tools like pipe cutter, sandpaper, solvent cement, and a marker suffice for most installations.
Q: Can I use uPVC pipes for hot water supply?
A: uPVC pipes are best for cold water or drainage; choose CPVC for hot water lines.
Q: How can I prevent leaks during DIY installation?
A: Ensure clean cuts, proper deburring, use recommended cement, and allow enough curing time.
Q: Are black uPVC pipes different from white ones?
A: Black uPVC pipes are often used outdoors for better UV resistance; white is typical indoors for water supply.
Q: What is the price of uPVC pipe?
A: The upvc pipe price varies by diameter, brand, and region. For reference, 1 inch upvc pipe and 4 inch upvc pipe prices are typically available from local suppliers online.